Cub Scout Patches Guide: Placement, Types, and Care
Table of Contents
ToggleCub Scout Patches Guide: Placement, Types, and Care
Cub Scout patches are more than decorations on a uniform. They show a child’s achievements, rank, and participation in Cub Scouting activities. Each patch tells a small story about what a Scout has learned or accomplished. For parents and new Scouts, understanding the types of patches, where they go, and how to care for them can feel confusing at first.
This guide explains Cub Scout patches, where you will learn the different types of patches, where each one should be placed, how to attach them, and how to keep them looking neat and lasting longer.
Types of Cub Scout Patches and What They Mean
Cub Scout patches come in different types. Each patch shows what a Scout has learned, achieved, or taken part in. They help tell the Scout’s story on the uniform.
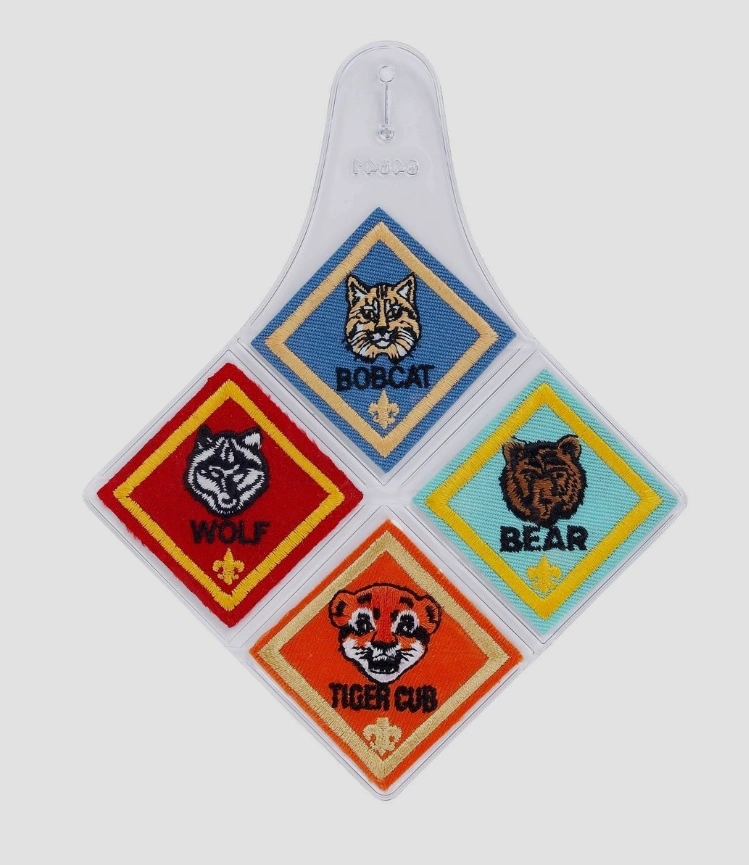
1. Rank Patches
Rank patches show the level a Cub Scout has reached. These include Lion, Tiger, Wolf, Bear, Webelos, and Arrow of Light. A Scout earns a rank patch by completing the required activities for that level. As the Scout grows and learns new skills, they move from one rank to the next. These patches are very important because they show progress and hard work.
2. Adventure Loops and Pins
Adventure loops and pins show the skills and activities a Scout has completed. These may include outdoor activities, fitness, teamwork, safety, and learning new things. Younger Cub Scouts wear adventure loops on their belt. Older Scouts, called Webelos, earn pins instead. These patches encourage Scouts to try new activities and build confidence.
3. Council and Unit Patches
Council and unit patches show where the Scout belongs. They display the local council name and the pack number. These patches help identify the Scout’s group and show that they are part of a team. They also help Scouts feel connected to other members in their pack.
4. Special Event and Activity Patches
Special event and activity patches are earned from camps, hikes, jamborees, and other special programs. They are usually colorful and fun. These patches remind Scouts of happy moments, new friends, and exciting experiences they had while taking part in Cub Scout activities.
Where Do Cub Scout Patches Go?
Putting Cub Scout patches in the right place helps the uniform look neat, organized, and correct. It also makes it easy for leaders and others to understand a Scout’s rank and group.
1. Left Sleeve
The left sleeve usually carries the council patch and the pack number. These patches show the Scout’s local area and the pack they belong to. They help identify the Scout’s Cub Scout family.
2. Right Sleeve
The right sleeve is where the U.S. flag patch and the den number are placed. The flag patch shows pride in the country, while the den number shows the small group the Scout works with inside the pack.
3. Left Pocket
Rank patches are placed on the left pocket of the uniform shirt. This is an important spot because it makes the Scout’s rank easy to see. It shows the level the Scout has reached through learning and effort.
4. Right Pocket or Vest
Temporary patches, such as camp, hike, or special event patches, are worn on the right pocket of the uniform or on a Cub Scout vest. Only one temporary patch is worn on the uniform at a time. Other patches can be saved or displayed on the vest for memories.
Iron-On vs Sew-On Cub Scout Patches: What Parents Should Know

Many parents wonder if it is better to iron or sew Cub Scout patches onto the uniform. Both methods can be used, but each one has its own benefits and limits. Knowing the difference helps parents choose the best option.
1. Iron-On Patches
Iron-on patches are fast and easy to attach. All you need is a warm iron and a cloth to protect the uniform. They are a good choice for temporary patches, such as camp or event patches. However, iron-on patches may come loose after washing or over time, especially if the uniform is washed often. Some parents use ironing only to hold the patch in place before sewing.
2. Sew-On Patches
Sew-on patches are stronger and last much longer. They take more time and effort to attach, but they stay in place even after many washes. Sewing is the best choice for important patches like rank patches and council patches. Many parents prefer sewing because it keeps the uniform neat and secure for a long time.
In simple terms, ironing is quick and easy, while sewing is strong and long-lasting. Choosing the right method depends on how permanent the patch is and how often the uniform will be worn and washed.
How to Put On Cub Scout Badges

Putting Cub Scout badges on a uniform is simple if you follow a few easy steps. Taking your time helps the badge look neat and stay in place.
First, decide where the badge should go on the uniform. Use the official Cub Scout patch placement guide if you are not sure. This helps you put the badge in the correct spot.
Next, place the badge on the uniform and use pins to hold it in place. This stops the badge from moving while you work.
If you are sewing, use a needle and thread to stitch around the edge of the badge. Sew slowly and carefully so the stitches are neat and strong.
If you are ironing, place a thin cloth over the badge to protect it. Press a warm iron on the badge for the time written on the patch instructions. Do not move the iron too much.
After sewing or ironing, check the badge to make sure it is firm and not loose. A well-attached badge keeps the uniform looking clean and helps the Scout wear it with pride.
Care and Maintenance Tips for Cub Scout Patches
Taking good care of Cub Scout patches helps them stay clean, neat, and last a long time. Simple care steps can make a big difference.
1. Wash Gently
Wash the uniform gently. It is best to wash by hand or use a gentle cycle on the washing machine. This helps in protecting the patches from damage.
2. Turn the Uniform Inside Out
Before washing, turn the uniform inside out. This reduces rubbing on the patches and helps keep the edges from peeling or fraying.
3. Avoid High Heat
Avoid using high heat when drying. Strong heat can weaken iron-on patches and make them come loose. Air-drying or low heat is safer.
4. Check Patches Often:
Check the patches often. If you notice any loose edges, sew or iron them back in place right away to stop further damage.
5. Store the Uniform Properly
Store the uniform neatly. Hang it up or fold it carefully to prevent wrinkles, bending, or damage to the patches.
Conclusion
Cub Scout patches are a very important part of Cub Scouting. They show a Scout’s growth, learning, hard work, and fun experiences. Each patch tells a story about what the Scout has done and learned along the way.
When parents and Scouts understand the different types of patches, where each patch should go, how to attach them properly, and how to take care of them, the uniform looks neat and correct. This also helps Scouts feel proud when they wear their uniform.
With correct placement and simple care, Cub Scout patches can stay bright, clean, and meaningful for many years. And to make your Cub Scout patches a thing of elegance, Fastprintstar offers a wide range of patch options that not only exude perfection but also last longer than ever imagined.